https://www.stumbleupon.com/su/2HUz3D/craftgawker.com/popular/favorites/
http://www.marthastewart.com/872280/top-crafts-2011#/193481

 In gift wrap emergencies when you've got the present but need some wrapping, here's an idea for turning a magazine page into a bow. There may be better ways to stick this thing together, but I used what I had on hand: staples and adhesive glue dots. Double stick tape should work, too.
 Cut a magazine page lengthwise into 9 strips, 3/4" wide. Leave 3 of the strips full length. Cut one inch off 3 of the strips. Cut two inches off 2 of the strips. Cut the last strip down to 3 1/2" long.
 Twist each strip to form a loop at both ends and staple it in the center. Shape the last, short strip into a circle and secure it with a glue dot.
 Layer the 3 longest pieces on top of each other, spacing them evenly and securing each with a glue dot. Add the next two groups of pieces, doing the same. And finally, stick the loop into the center.

 Use other papers, like a map of your city. Here's Chicagoland. Anybody see your street?
BALOON GIFT BAG
http://www.marthastewart.com/872280/top-crafts-2011#/193481
Make a gift bow from a magazine page
 In gift wrap emergencies when you've got the present but need some wrapping, here's an idea for turning a magazine page into a bow. There may be better ways to stick this thing together, but I used what I had on hand: staples and adhesive glue dots. Double stick tape should work, too.
 Cut a magazine page lengthwise into 9 strips, 3/4" wide. Leave 3 of the strips full length. Cut one inch off 3 of the strips. Cut two inches off 2 of the strips. Cut the last strip down to 3 1/2" long.
  Twist each strip to form a loop at both ends and staple it in the center. Shape the last, short strip into a circle and secure it with a glue dot.
  Layer the 3 longest pieces on top of each other, spacing them evenly and securing each with a glue dot. Add the next two groups of pieces, doing the same. And finally, stick the loop into the center.
 Use other papers, like a map of your city. Here's Chicagoland. Anybody see your street?
BALOON GIFT BAG

Instructions
- 1 This is everything you will need :]
Yes there is a pack of cookies I was hungry, they are not needed for this project XD
- 2 Start by pasting ripped up bits of newspaper onto the balloon. Use the brush to glue them on. By mixing the glue with water the glue will last longer plus it makes it easier glue all the paper on. Use the cup to sit the balloon on.
- 3 As you paste the newspaper on you will want to leave the top of the ballon uncovered like this as this will be the "lid" and where you put the goodies in :]
- 4 You will need about 3 or 4 layers of newspaper to make it strong enough but once you've done that you can pop the balloon. Only pop the balloon when it is totally dry. If it is still wet inside, as the balloon shrinks it will pull the inside layers of newspaper off.
- 5 On a piece of paper draw a circle a little bit smaller then the opening of the balloon and tie thread or a ribbon to it. It will all become clear soon this part XD quite cleaver even tho I've only got it to work once XD
- 6 Paint it! :D Now I didnt have a lot of time so I only painted 2 layers in red without painting it white first to get rid of newspaper prints. Make sure you don't start this the day before you need it XD
- 7 Put the goodies in! :D
- 8 Now this is the tricky part. The bit you cut out in step 5 needs be as thick as the rest of the balloon as the idea is that you stick that bit of paper on with one a few strips of newspaper so when you pull the thread/ribbon it gives way and the "lid" comes off. Hope that makes sense XD Once you've glued it on, paint it.
- 9 Then decorate it! :D Hope all this made sense, any questions just ask :]
DIY Tin Lanterns

I’m in love with my new recycled tea light can holder! It was so easy to make, and the best part is anyone can make one – you don’t need any special tools or materials.
Here’s what you do: Peel the label off an old tin can, fill with water and freeze in the freezer. Once frozen, draw a design onto the tin, and then pierce holes around the lines of your design using a nail and hammer. I had to keep taking breaks and putting my tin back in the freezer as my arm was aching from holding the hammer!

Once happy with your design, leave the ice to thaw out and wash off the pen marks. Then sit back and admire the pretty reflections on the wall when you light a tea light candle inside it! I’m going to make a few more of these once we have some more empty tins, I think they would look great displayed in a group and would also be great for summer evenings in the garden.

PAPER ROSE
It will just require you – some card and scissors and you can get your homemade flowers on for full deets on this DIY teach get thee gone to Cardgirl Invitations and see the end result via Dozi Design as Wendy is the original genius behind these.
*We would like to offer our sincere apologies to Gil Scott Heron for ruining a classic – but he had to be sacrificed in the name of blogging!
How to: Make Glowing Firefly Jars
"Flick glow-in-the-dark paint onto the inside of a mason jar. Allow to dry."
Make 'em. Tonight.
How To Glitter A Concrete Floor
Labels: glitter, home improvement, scary kathy
In the process of redoing our art studio, I wanted to go big and sparkly. We ripped up the icky carpet and found smooth concrete underneath. We went to Home Depot and bought a garage floor epoxy coating kit. I saw that it came with black and white decorative flecks, and instantly thought - "why not glitter?" We bought the sandstone color and I bought 6 jars of chunky gold glitter at Michaels (I was going to use my Crafty Chica Goddess Gold Glitter, but I didn't have enough to cover the room).
My new glittered floor. Yes, it is all sealed in!
Here's how I covered and sealed my floor in glitter:
Supplies:
1 garage floor coating kit (found at home improvement stores)
2 paint rollers, handle, 2 trays
1 scrub brush for cleaning the floor before you start
1 bucket and mop
6-8 jars of chunky glitter, bowl
1 brush for edging
1 gallon of water-based polyurethane varnish, high gloss
Fans, open windows!
Directions:
1. Use the cleaner in the kit to fully clean your floor. Mix it in the bucket, scrub, rinse with mop.
2. Scrape off any glue, patch holes, let dry.
3. Mix the two parts of paint mixture according to package directions. Stir vigorously. Seriously, this stuff is just like resin, you have to mix it really good or it won't work!
4. Pour into one paint tray, use a brush to paint the edges of the room.
5. Now use one of the rollers to paint a section of the room.
6. Throw handfuls of glitter in the air so it lands evenly. Don't throw or toss it like chicken feed or it will land in piles or splotches.
7. Keep working section by section, make sure to add glitter to cover the section lines so it will all blend.
8. If you want light glitter, just lightly toss. If you want heavy glitter, spread generously (like mine!).
9. Let dry over night, extra if you live in a humid climate. Use push broom to sweep off excess glitter. Scrub away areas that are too thick, you want it to all be even. Sweep up extra and toss it.
10. Open can of varnish, pour in the second paint tray and use second roller to apply an even coat. Let dry and add another coat. Repeat four or five times. You want the floor to be smooth so you can wipe up any spills.
11. Let dry for 2-3 days before moving in furniture or walking on it.
TIPS:
- If you use the flakes that come with the kit, toss those first and then add the glitter.
- Keep the window open in the room, keep the fans going. It's stinky!
- If you miss a spot, don't try to backtrack while the paint is wet, your feet will stick to the floor. I know from experience!
String Lights In The Bedroom
Felt Flowers
I fell in love with these felt flowers I saw on Pinterest so I made some of my own. Here is how...


They were so easy...now what to do with them?
Ideas:
-Headband
-Pin/clip (to put on your cardigan, purse, whatev)
-Make a wreath
-Sew them to the bottom of a skirt
-Make a decorative pillow
aturday, November 13, 2010
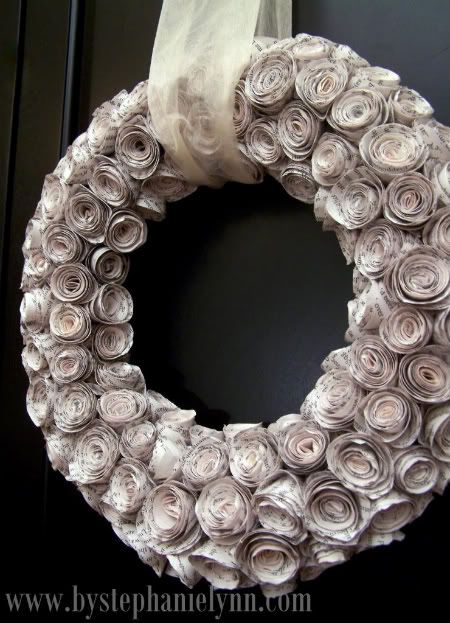
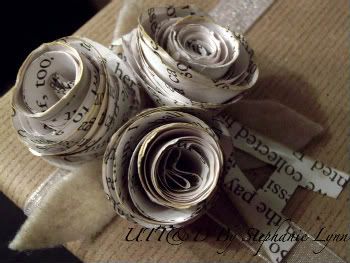
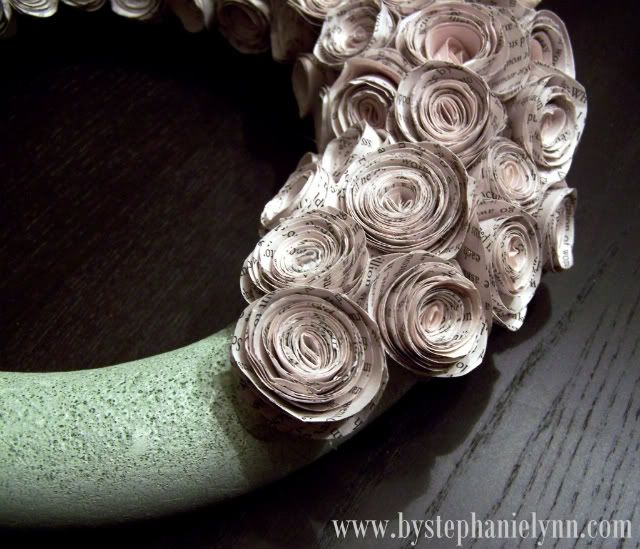
DIY Faux Curled Rosewood Wreath {Made From Rolled Recycled Book Pages}
I have seen various versions of Faux Rosewood Wreaths in just about every store and catalog for the upcoming season; most with a price tag running upwards of $40 or more. Some are crafted of paper and other of real wood shavings.
Last year I made a few rolled flower gift toppers from recycled book pages and they remind me so much of the curled wood roses I thought they would make a good substitute. {with a much lower price tag}
Materials Needed:Foam Wreath Form
Recycled Book Pages
Lots of Hot Glue
Ribbon to Hang
The full step by step tutorial I posted last year can be found {here}.
Basically you layer three book pages together and draw a spiral circle. Following the guidelines, cut along the spiral shape.
Starting with the outside of the spiral, roll the paper inward to create the flower shape.
Give the wreath form a light coat of white {or light color} spray paint to help camouflage any see-through spaces. Hot glue each individual paper flower onto the wreath, making sure to put them as close together as possible.
It seriously takes quite a few roses to fill the entire wreath, however I think the finished project has such a unique look.
{Simply Lovely}
Total Cost ~ $1
{The wreath form was the only thing purchased as I already had the recycled book, hot glue and ribbon}
I'm off to shop at one of my favorite stores today, Pier 1 Imports. I can't wait to report back my findings later on in the week!
The Sunday Showcase Party starts tonight! I can't wait to see what you have been working on this week. {if it is anything like the past couple of weeks, I know we are all in for a treat} Plus, there is a fabulous sponsor this week I can't wait to introduce!
Hope your weekend is off to a wonderful start ~ Enjoy!
Inspired by Yulia Brodskaya
 i can't get over how amazing these are.i wouldn't be surprised if yulia invented quilling. she is a 28 year old artist from Moscow who creates beautiful designes from vertical pieces of thin paper and her website is full of inspiration in color, line, shadow and technique. you don't have to be a fellow quiller to wish you were like this great lady.
even though her pieces would be amazing if they were drawn, it was the fact that they are 3d that caught my attention. i imagine one of her expert pieces would take hours, which i do not have... so i tried a simpler, version that can be displayed in any house.
when my husband and i were engaged, i bought wooden letters to spell out 'save the date' and covered them with different patterned paper. they are super cute, but i don't have anything to do with them now... except experiment!
(i couldn't resist showing our cute picture)


 the letters were already covered (i know, i didn't post a diy... but it's simple. you can do it.) so i chose one that i liked the pattern and color. it happened to be the letter h.
i picked out 4 colors of paper that went with the colors in the pattern and had them cut into 1/2" strips. quilling is easy if you have the patience, so if you have a free afternoon and a good movie, it becomes an easy, soothing project. there is also a website on how to make different shapes that you can check out to get ideas. make sure you have a glue gun handy so you can quickly attach your quills in any pattern you want.


 in hindsight, i would choose a letter that had a meaning. perhaps the first letter of your family's name? or even a series that spell out a word.
i only have an h.
i don't know what it stands for, but if anyone comes to visit and mentions it, i'll say happy.
Tutorial: Homemade Sidewalk Chalk
By Michelle Vackar, Thursday, October 21, 2010
by Michelle Vackar, Modern Handmade Child
One of our favorite outside activities at our home is drawing with chalk on the driveway. You can play hopscotch, four-square, and of course draw and create silly stories. My daughters and I were talking one day as we played hopscotch about how to make chalk and I thought to myself, let’s try it! It ended up being quite a lot of fun.What you will need:
• Toilet paper or paper towel tubes
• Scissors
• Duct tape
• Wax paper
• Small bucket or disposable container to make the recipe
• ¾ cup of warm water
• 1 ½ cups Plaster of Paris
• 2-3 tablespoons of tempera paint
• Paper bag or a “mess mat”** we made six tubes of chalk – we simply doubled the above recipe.**Step 1: If you are using paper towel tubes, cut each tube in half, so it is roughly the length of a toilet paper roll tube.Step 2: Cover one end of each tube with duct table to hold the contents within.Step 3: Cut as many pieces of wax paper as you have tubes. Roughly 6 inches X 6 inches. Roll the wax paper loosely and insert into the tubes so as to effectively line the tubes. The top of the wax paper will be higher than the tubes. The wax paper liner will keep the chalk mixture from sticking to the cardboard tubes and will eventually be peeled off.Step 4: Pour the warm water into your bucket. Sprinkle the Plaster of Paris over the water and stir the mixture with a plastic spoon. The Plaster of Paris roughly starts hardening within 20-30 minutes, so you need to work fast so that it does not harden too quickly.Step 5: Next you will want to pour the tempera paint into the Plaster of Paris mixture and stir so that it is mixed thoroughly. If you would like brighter colors add more tempera paint into the mixture. We wanted to make a variety of colors of chalk, so we spooned about 1/2-3/4 cup of Plaster of Paris in each separate container and mixed in the different tempera paint colors into each bowl. We ended up making six different colors and next time might mix more.Step 6: Stand each tube with the tape side down on a cookie sheet/flat baking dish/box lid to make the project easier to transport to a drying location. Pour or spoon the colored Plaster of Paris mixture into the wax paper lined tubes. Lightly tap the sides of the tubes to release the air bubbles (so you do not have holes in your chalk). After you have poured the mixture into the tubes start another color. When done trim the excess wax paper so that it is closer to the cardboard tube.Step 7: It took 3 days for our chalk to dry. On the last day, we peeled off the duct tape so that the underside could dry. When the chalk dries, peel off the paper tubes and wax paper. Your chalk is ready!Modern Handmade Child is a seasonal online publication celebrating handmade living in a new way. Our mission is to provide a fun and valuable resource helping families to embrace the handmade way of life, by intertwining the skills and values of days gone by with the trends and technologies of today. Our editors and contributors come together from around the world, including Europe, Australia, Canada, and many parts of the United States. Modern Handmade Child is published quarterly, and available for free at modernhandmadechild.com.
Ice-cube trays serve as molds, giving the fizzies their shape. Using a flexible silicone model lets you slide the cubes out smoothly without breaking them.
Show off the colors of the bath fizzies in glass jars with screw tops, the kind used for storing sugar and flour. Pack each type of fizzy in a separate jar so the scents won't meld. Write the name of the scent on a vellum tag (choose a shade that matches the fizzies), and punch a hole in the top. Thread the tag with ribbon, and tie it around the jar.
Citric acid, a common food additive, is available at wine-making-supply stores, some spice shops, and online. When citric acid is combined with baking soda and placed in water, a chemical reaction creates bubbles.
Makes 1 dozen (use 2 per bath)
Tools and Materials
1/2 cup citric acid
1 cup baking soda
3/4 cup cornstarch
1/4 cup organic cane sugar
About 6 drops food coloring
10 to 15 drops essential oil(s)
Special equipment: 2-ounce travel-size spray bottle, plastic pipette, silicone ice-cube tray, storage jars
Directions
1. Stir together citric acid, baking soda, and cornstarch in a glass measuring cup.
2. Pass mixture through a fine sieve or a flour sifter into a mixing bowl. Stir in sugar.
3. Fill spray bottle with water, and add food coloring. Spritz mixture lightly (it should become damp but not fizzy) until you can pack mixture with your hands.
4. Using pipette, add oil, 1 drop at a time, until strength of scent is to your liking. Using a metal spoon or your hands, mix ingredients until color is even throughout (mixture will begin to dry out; when this happens, spritz until packable again).
5. Spoon into ice-cube tray, pressing firmly. Let dry at room temperature overnight. Pop out of tray gently. Transfer to jars.
Decorative Paper Lanterns
We Also Love
1 of 2These decorations really layer on the style. Any pale-colored paper lantern can be covered with tissue circles (buy them precut -- no scissors required) for a charming fluttery finish. They may look intricate, but it takes only half an hour to make one. The lanterns appear festive and ethereal by day and, if you place low-wattage lightbulbs inside, softly radiant by night.
Tissue-Paper Lantern How-To
The lanterns [on the previous page] are monochromatic, but you can play with the design by creating an ombre pattern (gradations of the same color) or stripes. You can even use green disks at the tops of the lanterns so that they resemble berries with leafy stems.
Tools and Materials
- Tissue-paper disks in assorted colors
- Double-sided tape
- 14-, 16-, or 18-inch-diameter paper lanterns
2. Working toward the top, continue sticking and overlapping disks to cover the lantern.


No comments:
Post a Comment